

Most labs feel the operational drag: portal logins, downloads, retyping prescriptions, fixing missing info, chasing remakes.
But when it’s time to invest, a feeling doesn’t get a project approved.
As the guide puts it:
“We need automation” isn’t a business case. Numbers are.
This post is a high-level summary of a framework you can run in ~15 minutes to estimate the ROI of intake automation.
The guide starts with intake because it typically has the fastest payback.
It has two core buckets:
Industry benchmark: labs with 8+ portals typically spend 1.5–2.5 hours/day just downloading scans.
Benchmark: 3–5 minutes per case. A 40-case lab spends 2–3.5 hours/day on data entry.
The worksheet converts daily intake hours into annual labor cost using:
Example from the guide:
A 40-case lab spending 4 hours/day on intake = 1,000 hours/year = $25K–$35K/year on downloads + entry alone.
Manual entry creates errors → errors create remakes → remakes destroy margin.
Benchmark: data entry errors can cost labs 2–5% of revenue (ex: $1M lab = $20K–$50K annually).
This is your “cost of doing nothing”—the money you’re spending (or losing) that automation can recover.
The guide recommends not assuming perfect automation overnight. Instead, apply realistic reductions:
Then it suggests a simple conservative method:
Apply a 75% efficiency gain to your total opportunity to estimate annual savings from intake automation alone.
This post is a high-level summary. The full PDF includes the worksheets, benchmarks, and a walkthrough for building an ROI case you can use with partners or investors.
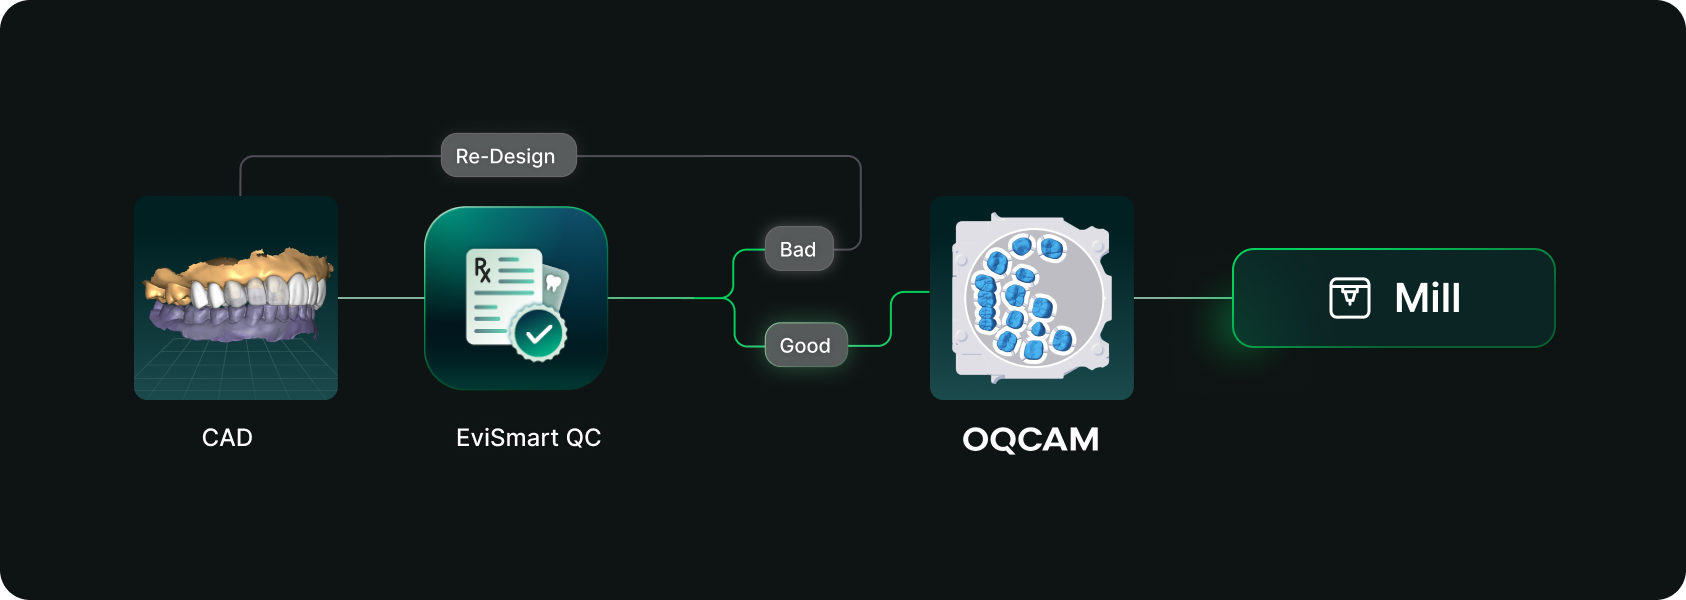
Designs you order from EviSmart arrive in your Oqcam already formatted. Named the way your nesting rules expect, with shade and material attached, and pointed at the machine that case belongs on.
The routing is decided per case. An implant case sends the crown to the mill and puck you cut implant crowns on, and the model to the printer you print models on. Different case types, different machines, chosen automatically rather than by a tech working through a dropdown for every file.
The trigger is QC approval. EviSmart designs your cases your way. The same team works on all your cases and learns what a good case looks like to you. Once your case passes our QC, it triggers a greenlight to send the design directly into your Oqcam account in under a minute.
Once the file arrives in your Oqcam, all your CAD/CAM technicians can review the nested design before starting the mill. That final QC step does not change and is not meant to.
Setup is one session. We connect your Oqcam account and agree where each of your products should go, using the routes and materials you have already built there. Nothing new to create, and you only revisit it if something changes.
Automatic sending only works if you trust what is being sent. Once a case is nested it gets cut, and a design that was not right is wasted material.
You choose what flows. During setup we map only the case types you want moving on their own. Anything unmapped never sends. It waits for you exactly as it does today.
Most labs start narrow. Bread and butter work first, night guards and posterior single units, then widen once they have watched it run for a few weeks. The lab that has been live longest started exactly there and has added case types since.
Your approval stays. This removes the file shuffling between design and CAM. It does not remove your eyes from the build.
For labs outsourcing design work the math gets compelling somewhere north of 30 cases a day into nesting, because that is where the handoff stops being an annoyance and starts being a role.
Not touchless design. Touchless handoff. Every step in that chain that requires judgment should keep requiring judgment, and every step that never did should stop requiring a person.
Nesting requires judgment. Confirming a build requires judgment. Renaming a file so software can read it does not, and never did. It was a workaround that quietly became somebody's job.
Nobody pays you to rename files.




