

A beautiful anterior restoration isn't just about getting the tooth shape right. You can have the perfect shade and a well-polished surface, but if the tooth axis is off, the contacts aren't positioned correctly, or the gingival contours don't follow the patient's anatomy, the final result can still look unnatural. And some design issues go beyond esthetics. They can affect the fit, cleanability, and overall outcome of the restoration.
Want to keep this checklist at your workstation?
The short version
Five important checkpoints are tooth axis, interdental contacts, gingival zenith, tooth proportions, and facial line angles. Reviewing an anterior CAD design means looking at more than individual tooth anatomy. Here's how to evaluate each one before approving your next anterior restoration.
The long axis of each anterior tooth plays an important role in how balanced the smile looks.
When designing maxillary anterior teeth, start by checking their axial inclination relative to the facial midline and neighboring teeth.
Central incisors generally have a more upright appearance, while lateral incisors and canines often show progressively greater distal crown inclination relative to their roots.
Even a small difference in angulation can affect the perceived symmetry of the anterior teeth, particularly when the central incisors don't complement each other.
What to check in CAD
Design tip: Don't force every anterior tooth into perfect parallel alignment. Natural axial variation helps create a smile that looks like teeth, rather than identical copies.
Interdental contacts affect more than how tightly adjacent restorations fit together.
Their length, location, and contour influence the appearance of interdental papillae and the spaces between the teeth.

When the contact area sits too far incisally, the gingival embrasure may appear larger, contributing to visible black triangles.
A commonly used anterior design reference is the 50:40:30 rule, which describes the approximate contact-area lengths relative to central incisor crown height:
These are esthetic guidelines, not fixed measurements for every patient.
What to check in CAD
Design tip: Contact design alone cannot guarantee the elimination of black triangles. Papilla fill also depends on periodontal anatomy, including the distance between the contact area and the underlying bone crest.
The gingival zenith is the most apical point of the gingival margin around a tooth.
It's a small detail, but it strongly influences the perceived position, angulation, and overall shape of anterior teeth.

In maxillary central incisors, the gingival zenith is commonly located slightly distal to the tooth's vertical axis. This subtle offset helps establish a natural gingival contour and influences how the crown emerges from the gumline.
However, zenith position varies depending on tooth type, gingival anatomy, and individual patient characteristics.
What to check in CAD
Design tip: Use the patient's existing gingival architecture as your reference. A textbook zenith position may not be appropriate for every patient, especially when gingival asymmetry or recession is present.
Tooth proportions can change how an entire smile is perceived.
A central incisor that's too wide can look square and bulky. One that's too narrow may appear unusually long or out of balance with its neighbors.
A commonly used starting point for maxillary central incisors is a width-to-length ratio of approximately 75–80%. For example, a central incisor measuring 10 mm in clinical crown length would have a width of approximately 7.5–8 mm at that ratio.

But this is a reference, not a universal target. Patient-specific anatomy, facial proportions, and the intended esthetic outcome should guide the final design.
What to check in CAD
Design tip: Don't rely on the width-to-length ratio alone. Consider the planned incisal edge position and gingival margins before finalizing the proportions, especially in comprehensive smile makeover cases.
Facial proportions are one of the inputs for tooth proportions. Face shape can give you a starting point for central incisor form before you refine width, length and line angles.
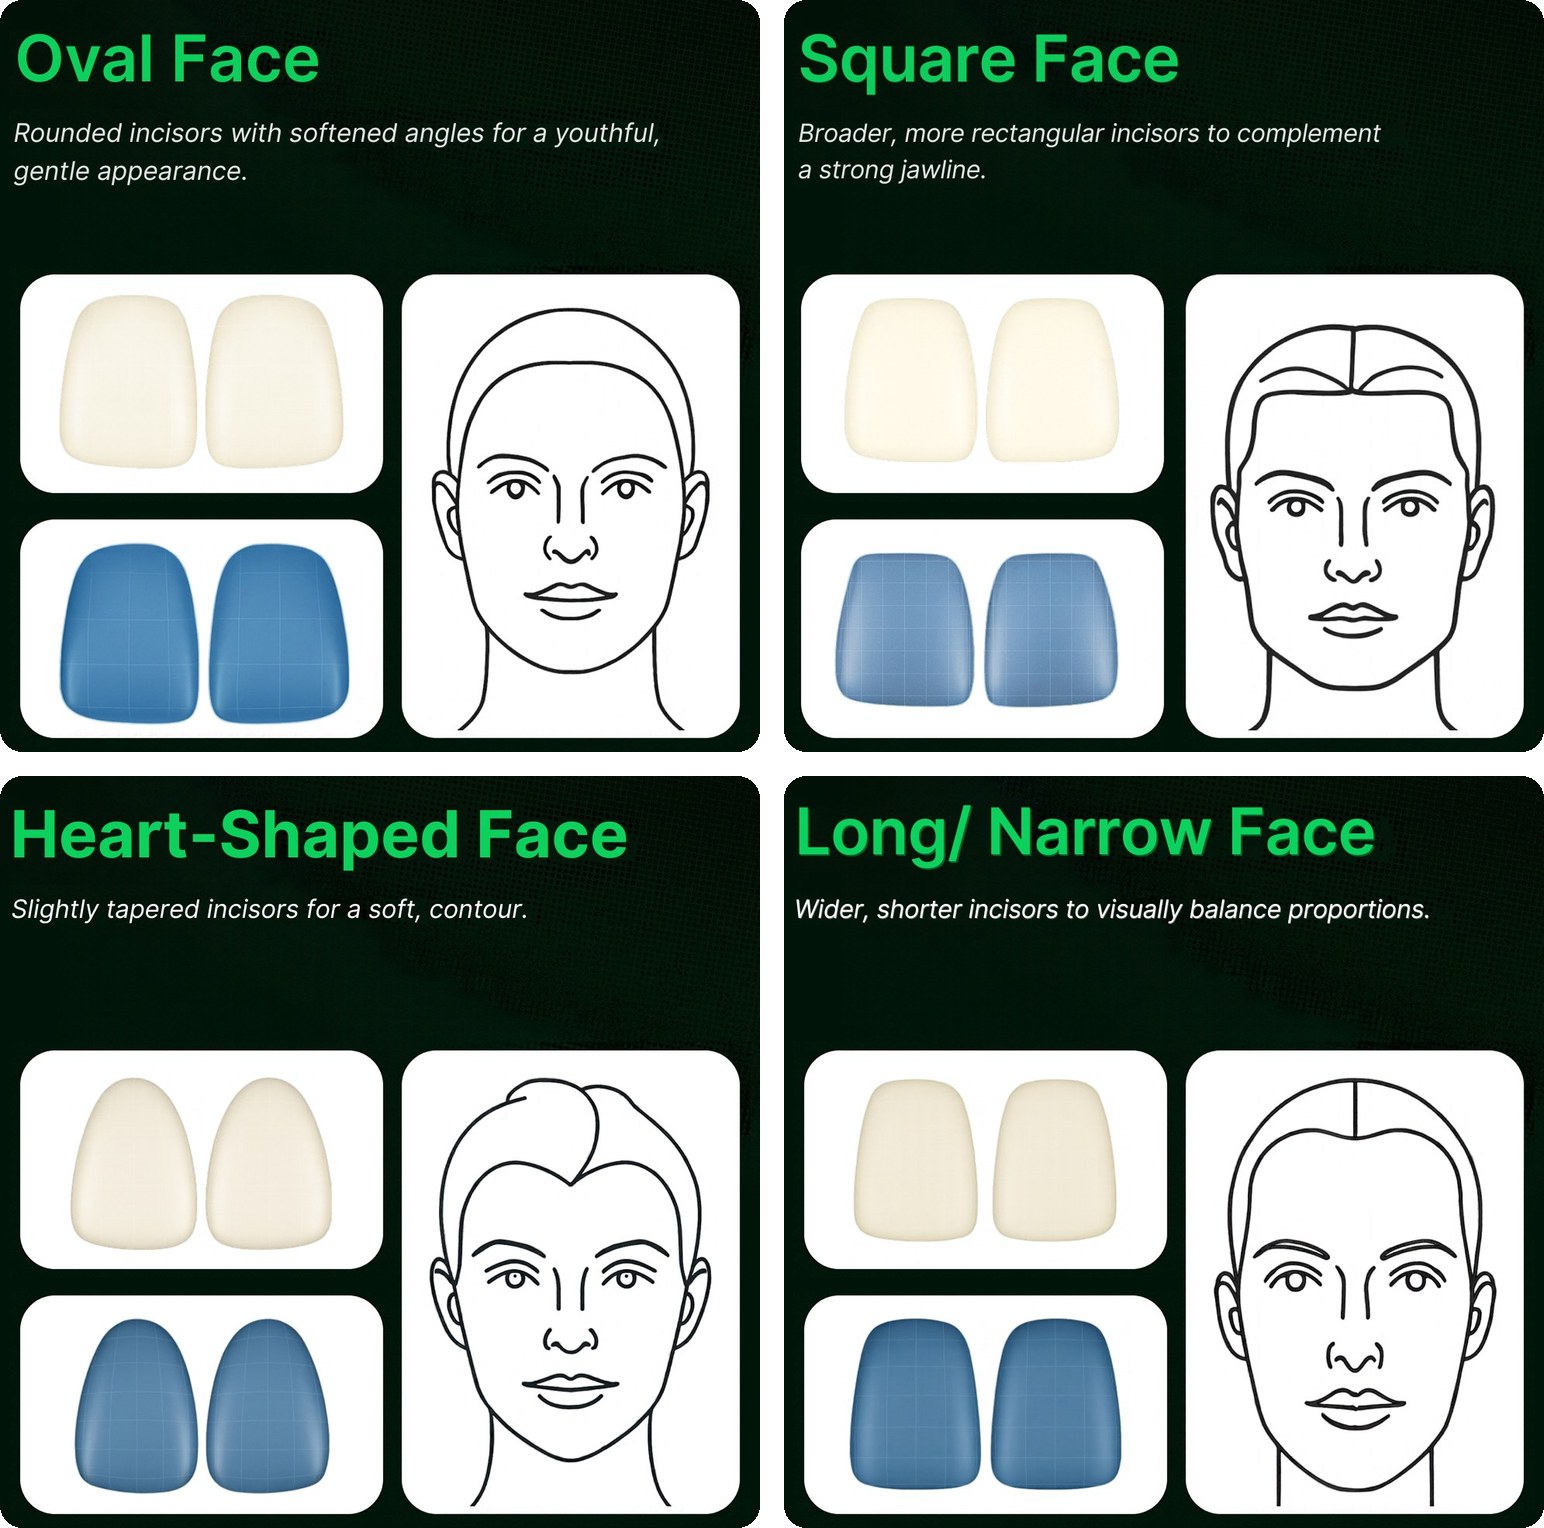
Keep in mind: Face shape is a starting reference for tooth form, not a rule. Confirm the final shape against the patient's smile, existing dentition and treatment goals.
Two anterior teeth can have nearly identical overall dimensions and still look completely different. One reason is the position of their facial line angles.
These are the transitions between the facial surface and the mesial or distal surfaces of a tooth. They influence how light reflects off the restoration and how wide or narrow the tooth appears from the front.

Moving the line angles toward the center can make a tooth appear narrower without changing its overall mesiodistal width. That's why line angles are particularly important in anterior CAD design, where small contour adjustments can noticeably change the appearance of a smile.
What to check in CAD
Design tip: Before making a central incisor physically narrower, check whether refining the line angles could achieve the intended visual proportion.
Before approving your next anterior restoration, review these five questions:
A checklist won't replace clinical judgment, but it can make anterior CAD reviews more consistent and help teams identify design concerns before fabrication.
Five important checkpoints are tooth axis, interdental contacts, gingival zenith, tooth proportions, and facial line angles. Together, they influence the alignment, shape, contours, and perceived symmetry of anterior restorations.
For maxillary central incisors, a width-to-length ratio of approximately 75–80% is a commonly referenced esthetic guideline. However, suitable proportions vary depending on tooth type, facial characteristics, existing dentition, and the intended treatment outcome.
Black triangles occur when the interdental papilla does not completely fill the gingival embrasure. Contributing factors may include periodontal bone levels, tooth shape, root positioning, and the position of the interproximal contact area. Adjusting the restorative contours can help in selected cases, but contact design alone does not guarantee papilla fill.
Facial line angles influence how light reflects from the restoration and affect the perceived width and shape of the tooth. Their placement can make a tooth appear wider or narrower without changing its overall dimensions.
The difference between an acceptable anterior restoration and a natural-looking one often comes down to the details. A slightly misplaced line angle, an overly broad contact, or a crown proportion that doesn't complement the patient's smile can change the appearance of the final restoration.
Reviewing these five checkpoints gives you a more consistent way to evaluate your anterior CAD designs and communicate adjustments with your design team.
But you don't have to handle every part of the CAD design process yourself. For cosmetic dentists managing comprehensive smile cases, having reliable CAD design support can mean less time spent designing and revising files, and more time for treatment planning, smile consultations, and caring for patients.
Clinical references
These checkpoints are educational design references, not universal treatment specifications. Final restorative decisions should be individualized and clinically verified by the treating dental professional.
Our CAD designers follow your clinical preferences, with same-day turnaround. You stay in control of the final design.
Planning a full smile makeover? Read how to present a smile makeover, from case presentation to same-day temps.
Learn more about EviSmart CAD for Clinic.


